
ATG Customer Resources
Thank you for your Chaos Enscape purchase. We are honored that you've chosen to work with us! It's our top priority to ensure you have the best experience with Enscape and our team from day one, so we’ve compiled the following resources to serve as your comprehensive guide. Use this page to get started with your software and access helpful resources to ensure you are successful in using and managing Enscape.
Colin Browning
ATG Enscape Specialist
Book time with me!
cbrowning@atgusa.com
New Purchases
ATG Sales
800-935-4894
Tech Support
support@atgusa.com
1-888-615-0677
Available 8am to 5pm coast-to-coast
General Inquiries
whyatg@atgusa.com
atgusa.com/contact
800-935-4894
How to Install Enscape
Learn step-by-step how to properly install and configure Enscape on your computer or watch the video guide.-
Before installing Enscape, ensure your CAD software is closed and that you have the correct permissions to install the software on your Windows OS.
-
Open and run the Enscape.exe installer from the location on your computer that it was downloaded to.
Note: If this is not the first time you have installed Enscape and you have a prior version installed, we recommend that you move any files to a temporary location before uninstalling. It is also advised to reboot your computer before running the 4.0 installer. Versions including 3.0 and newer will automatically uninstall previous versions whenever a newer version is installed. If you are rolling back to an Enscape version before 4.0, you must uninstall Enscape manually before rolling back to avoid performance issues.
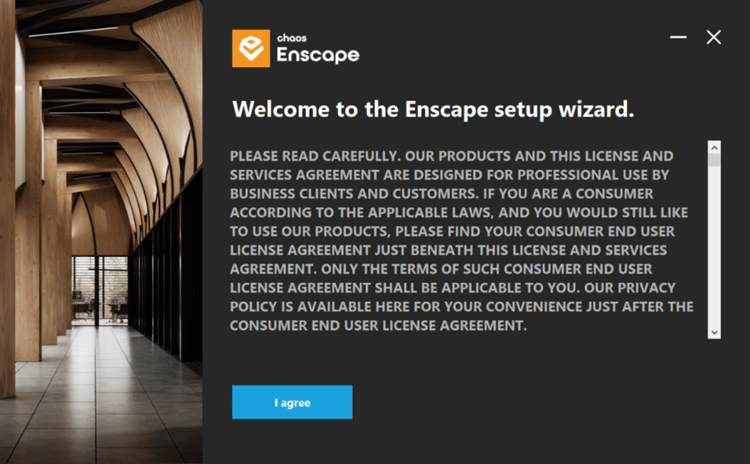
Read through and agree to the End-User License Agreement
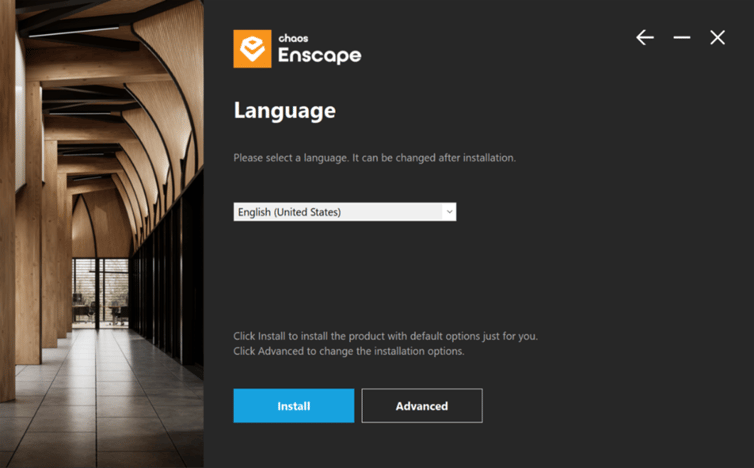
Select your preferred language and click Install. Language settings can be changed after installation under General Settings > Preferences
Simple Installation
Once the language has been selected and you click Install, the installer will proceed to install Enscape and all its sub-features for the currently logged in user in the default location: C:\Program Files\Enscape
If you have a previously installed version, Enscape will automatically uninstall the old version first:

The next screen is for Essential Software Packages. If you’re missing software that Enscape requires to function correctly, you will see it listed here with a link to find the installer files. It is advised that you install any missing requirements listed on this screen, as Enscape will not function correctly otherwise.

After installing the requirements and clicking Next, Enscape is finally ready!
Now you should be able to open your CAD software and Enscape should appear as a top-level menu option, or as a Toolbar. If you cannot see Enscape in your CAD, then you may need to enable it in the CAD’s workspace.
Advanced Installation
Advanced installation becomes available after accepting the license agreement and selecting the language. This option is only available for a fresh installation of Enscape, so if you’d like to access these options again, you will need to uninstall Enscape first.
When clicking Advanced, you have the option to install just for you, the currently logged in user, in a per-user folder, or for all users of this machine.
Install just for you (single-user)
If you choose the Install just for you option, that currently logged in username will be placed between the brackets in the installer window to confirm which user folder Enscape will be installed to.
Additional options for custom installation, including whether to install CAD plugins, are now available for selection.

When done, click on the Install button which will allow the installation to proceed.
Once installation is complete, you will see the installation confirmation screen.
Install for all users
By choosing the option to install for all users of this machine, you will gain an extra option to change the installation location. To change the destination folder, click the three dots on the right side of the path and navigate to where you’d like to install Enscape. Once the destination is set, click Next and pick the CAD plugins you’d like to install.

Once installation is complete, you will see the installation confirmation screen.
How to Manage Enscape Users
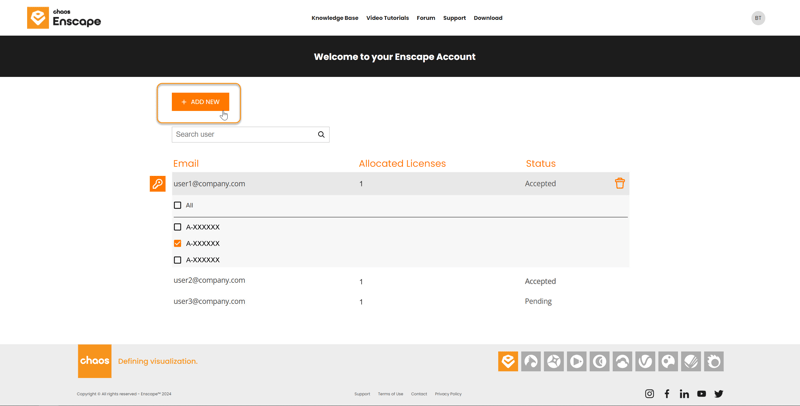
Batch User Account Creation
If you have a list of emails in e.g. Excel and would like to add them as new users in Enscape, follow these simple steps:
- Organize emails in a spreadsheet
- Replace “.com” with “.com,” (notice the comma after the .com)
- Select all emails and Copy them to the clipboard
- Paste all emails into the Enscape portal (The format is also displayed in the input field)
Once filled in, just click Invite and the respective users will be added to your list of users.
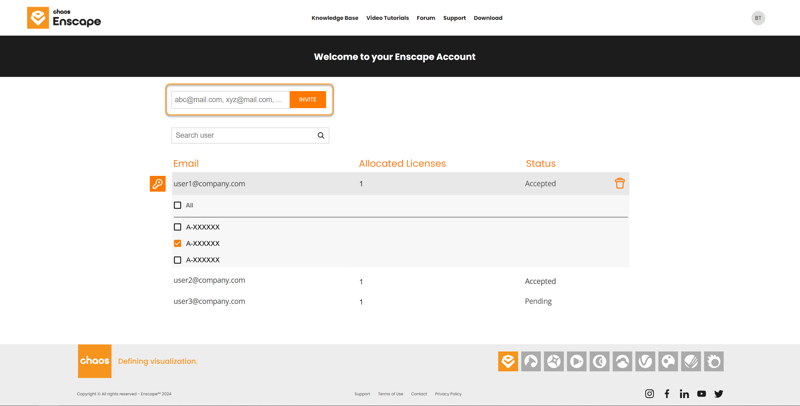
Once the user has been invited, they will receive an email containing a link to allow them to set a password. Once that has been done the user will appear in the list of users under the User Management page, where the administrator can assign access to a specific Enscape License Key. Each user is listed under their associated email, along with the number of licenses allocated to that user, as well as the current status of the user.
Users can be deleted altogether via the trash can icon and licenses revoked via the checkbox next to each subscription number. Deleting a user is a command for the server to notify the user via an initial email warning that the account will be deleted in 14 days. If the user doesn’t cancel the deletion in the following 14 days, they will receive an email informing them their account has now been deleted. Users holding a fixed-seat license will be required to manually remove the license key from their machine.
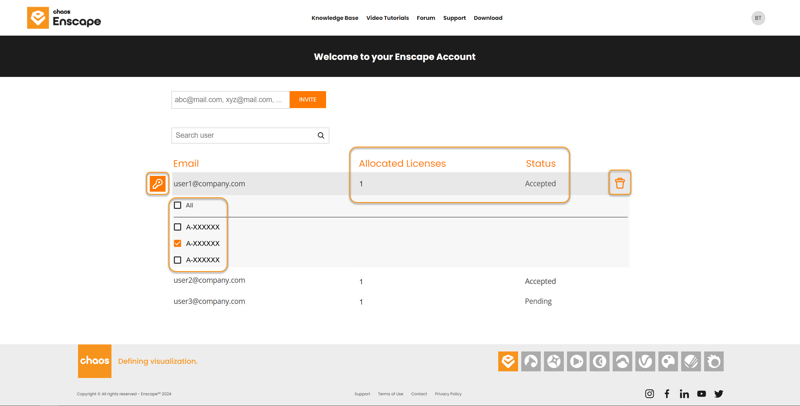
User management section
Once the user is added to the list and a license is assigned, they can then log in to their account via the Enscape Account ![]() window -> Account (Sign in) button.
window -> Account (Sign in) button.
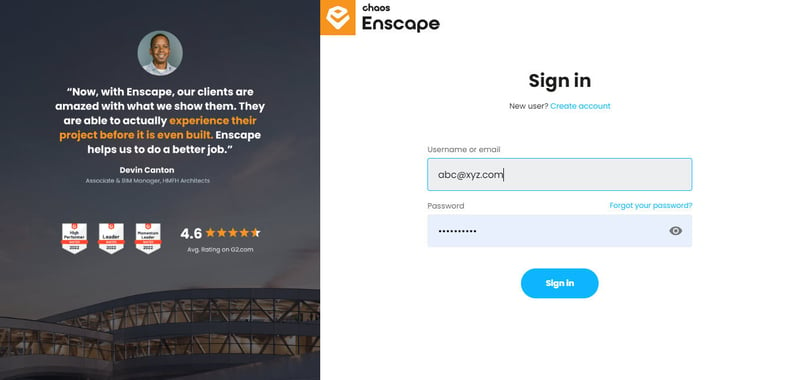
Once you click sign in, you will be directed to the sign in page on your web browser. Here you can fill in your login credentials and click Sign in.
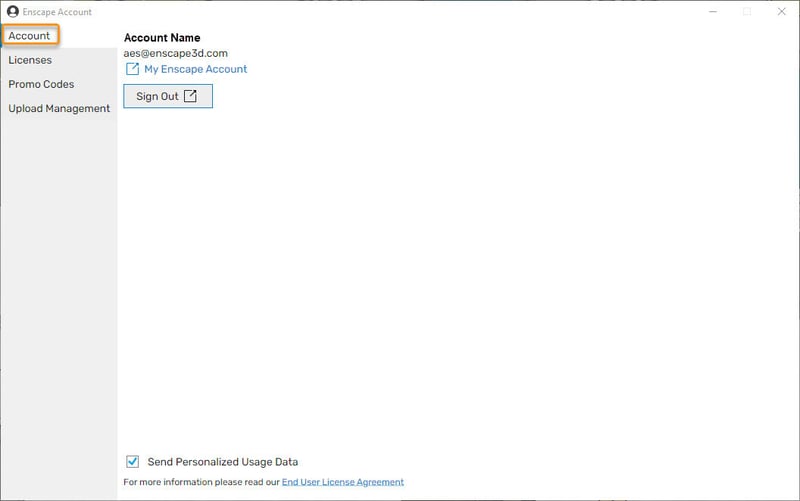
After successfully signing in, you will be able to see your account details in the Enscape Account ![]() window -> Account.
window -> Account.
How to Set Up Floating Licenses
Chaos products with a floating license can be shared between multiple users and devices within a local network or over the cloud where an internet connection is the only requirement.
In this guide, we’ll outline how to set up floating license(s) over the cloud for both administrators and users, allowing you to use a shared pool of floating licenses without the need to be on the same local network or connected to an office network through a VPN.
Setup
To use cloud-based floating licensing, both administrators and users will need to complete a short list of steps.
Administrators need to:
- Add Users to their Organization
- Enable Floating License Sharing for their Organization
Floating licenses can be shared within an Organization only when they are assigned to the Administrator. Administrators can add other users to their Organization and share floating licenses with them. If you have assigned floating licenses to members in your Organization, you will need to revoke them if you want those licenses to be part of the shared pool.
Users need to:
- Be part of an Organization
- Perform a default installation of the Chaos product(s) and sign into the product with their Chaos account.
Users can follow the steps in the email they receive for being added to an Organization by the Administrator. If the user does not have an account, the email will lead them through the steps to create one.
Administrator Workflow
The Administrator can share the floating licenses with all Members (or Guests) within their Organization. Any user added to the Organization can use shared licenses by installing the Chaos product with all default settings and signing in to the product with their own Chaos Account.
- Log into my.chaos.com and go to the Organization tab on the toolbar.
![]()
- Go to the three-dot menu next to Users and select Invite Users.

- Invite users to your Organization. For instructions on this step, see the My Chaos Guide page.
- To enable Floating license sharing, open the three-dot menu next to the option and click Enable Floating license sharing.

At this point, any user within the Organization can use a shared floating license.
Fixed (or Solo) licenses are not affected when Floating License Sharing is enabled. Instead, they are assigned individually.
User Workflow
Once Floating License Sharing is enabled for the Organization, any user in the Organization can use the shared licenses by installing their Chaos product with all the default installation settings and signing in to the product with their Chaos Account. When added to an Organization, users receive an email confirmation. If the user does not yet have a Chaos Account, the user can create one by following the link in the email invitation that they receive.
- Have the Administrator add you to their Organization. The Administrator can add you to the Organization with your email. If you do not yet have a Chaos Account yet, you can create one by following the link in the email confirmation you receive.
- Install the Chaos product(s) your Organization has a license for. Proceed with a default installation. This installs the Chaos license utility locally. Sign in with your Chaos Account when prompted.


Migrating to Cloud-Based Floating Licensing
If you have already set up floating licenses for your team with a centralized Chaos License Server and you want to move to the Cloud-Based floating licensing setup:
- The Administrator needs to enable the Floating License Sharing option in the Organization tab of the my.chaos portal.
- All floating licenses need to be assigned to the Administrator. If you have assigned floating licenses to individual users in the organization and you want those licenses to be part of the shared pool - you will need to revoke the assignments.
- The Administrator needs to add all users to the administrator’s Organization through the my.chaos portal.
- In case users have configured their Chaos product to connect to a centralized remote License Server, they will need to re-install the Chaos product and select Local Licensing in the installer’s Advanced options. Users will then need to sign in to the product with their Chaos Accounts.
See the sections below for more detailed information on changing your floating license setup to the Cloud-Based Floating Licensing one.
Remote Licensing
If you already have a floating license setup with a centralized License Server within your local network, your users have selected Remote licensing in the Advanced installer options. To move to a Cloud-Based floating licensing setup, users will need to switch to Local licensing by re-installing the product and selecting Local licensing in the Advanced installer options. If users are installing a Chaos product for the first time, they only need to install with all the default options without selecting any of the Advanced installer options.
Floating Licenses Assigned to Users
In case floating licenses are assigned to individual users in the Organization and are needed to be used as Shared Floating Licenses, the Administrator has to revoke the assignments. Only floating licenses assigned to the Organization’s Administrator are part of the shared floating pool. Then, enabling the Floating license sharing option through the my.chaos portal makes the licenses available to the users in the Organization.
Notes
- Floating License Sharing only affects Floating or Premium licenses. Fixed or Solo license can be individually assigned, but cannot be part of a shared floating pool.
- Only the Administrator’s licenses are shared with the Organization. Individually assigned floating licenses are not part of the shared pool, unless the assignments are revoked.
- Only licenses owned by the Organization can be shared. Licenses assigned to the Administrator from another Organization where the Administrator is a Member / Guest are not part of the shared pool.
- Only Administrators can enable or disable Floating License Sharing for the Organization.
- A Cloud-Based floating license cannot be borrowed for offline use by a Member or Guest. The License needs to be personally assigned to that user, to allow them to borrow the license. For more information, on how an Administrator can assign a product license to a user, see the User Management Actions page.
- Shared licenses can be engaged by Organization users, but they will not appear in the users’ list of licenses
Get Started with Enscape 4.1 + Chaos Licensing
Enscape 4.1 comes with licensing changes in an effort to provide a unified experience for all Chaos customers across its different products and integrations. For those wishing to upgrade to Enscape 4.1 and the new Chaos licensing now, here are the steps to get you started depending on the type of user you are and the license you are using.
Chaos Accounts
Everyone who owns an Enscape license now has a unified Chaos account. You can log in using your existing Enscape account credentials.
Fixed Licenses
A fixed license can be used by one person on one device.
Single user: Install the new Enscape 4.1 using the default installation options. Sign in with your account and start using the product.
Small teams with multiple users: Small teams who used to assign fixed licenses to their users can continue to use the licenses in the same way. This setup is straightforward and offers great flexibility. You can refer to the documentation on adding users to an organization and assigning license seats in the Enscape Knowledge Base.
Floating Licenses
Floating licenses can be shared among multiple users in one organization, but this setup requires special attention during configuration. We recommend that floating license customers who are prevented from performing the changes described below should continue using their current version of Enscape for the time being.
Floating License Setup for Smaller Teams (2-10 users):
Sharing floating licenses among employees in one physical location:
- On the first machine, install Enscape and log in with the license owner credentials.
- For each subsequent installation, select Advanced and enter the IP address of the first machine.
If a user needs to remotely access the license outside the physical location:
- Assign an individual seat to the user. Please note that when you assign a seat to a user, it reduces the number of available license seats for others until the assigned seat is returned to the pool. For example, in a company with 5 users and 2 floating license seats, if one seat is assigned to a user, the remaining 4 users will only have 1 seat available in the floating license pool.
Floating License Setup for Larger Teams (10+ users):
Larger teams can benefit from several features:
- Unified login experience for all Chaos products.
- Optional integration with your corporate sign-in provider (OpenID Connect, Azure AD, PingFederate).
For those sharing floating licenses among employees in one physical location:
- Install a license server and configure Enscape product installations to point to it within the same network.
For remote access to the license server:
- Contact your administrator to set up a Chaos License Server within your office network.
- Users can access the remote license server without a VPN using a public IP address. This can be done by creating a firewall exception for the specific IP and port or installing the License Server in the DMZ/edge network zone.
Cloud-based Floating Licenses:
Cloud-based Floating Licensing allows you and your team to use a shared pool of Floating licenses entirely through the Cloud. This allows users to use licenses from any location without the need to be on the same local network or connect to an office network through a VPN.
To use this setup, both the Administrator (who owns the Floating licenses) and users (Members or Guests in the Organization who use the licenses) need to complete a short list of steps found in the Floating License Guide tab.
Why is the licensing change needed?
Unifying the licensing experience will ensure our customers have a unified way to manage and use products across the Chaos portfolio and allow them to smoothly move through the Chaos ecosystem.
What else changes?
- The Chaos Self-Service Portal, which has been the go-to portal for all other Chaos products, now replaces my.enscape3d.com, allowing Enscape users to use the same Chaos sign-in and licensing system.
- New portal for subscription and license management: When visiting my.enscape3d.com, you will be redirected to my.chaos.com, where you can manage your Enscape licenses and more. My Chaos serves as the self-service portal for all Chaos products. You can now use My Chaos for subscription, license, and user management. The Administrator Guide will help you get started.
- Upload Management (Panoramas and web standalones) remains in My Enscape.
- Before installing Enscape, ensure your CAD software is closed and that you have the correct permissions to install the software on your Windows OS.
- Open and run the Enscape.exe installer from the location on your computer that it was downloaded to.
Note: If this is not the first time you have installed Enscape and you have a prior version installed, it is recommended that you move any files to a temporary location before uninstalling. It is also advised to reboot your computer before running the 4.0 installer. Versions including 3.0 and newer will automatically uninstall previous versions whenever a newer version is installed. If you are rolling back to an Enscape version before 4.0, you must uninstall Enscape manually before rolling back to avoid performance issues.
- When installing Enscape, the wizard will guide you through various steps of the installation process:
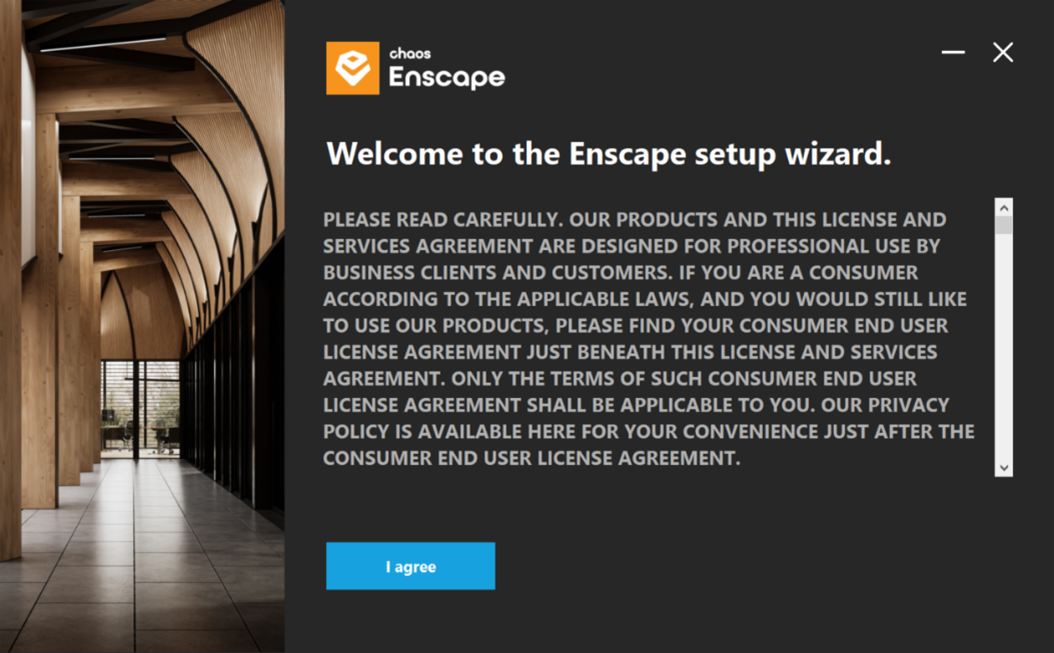
Read through and agree to the
End-User License Agreement
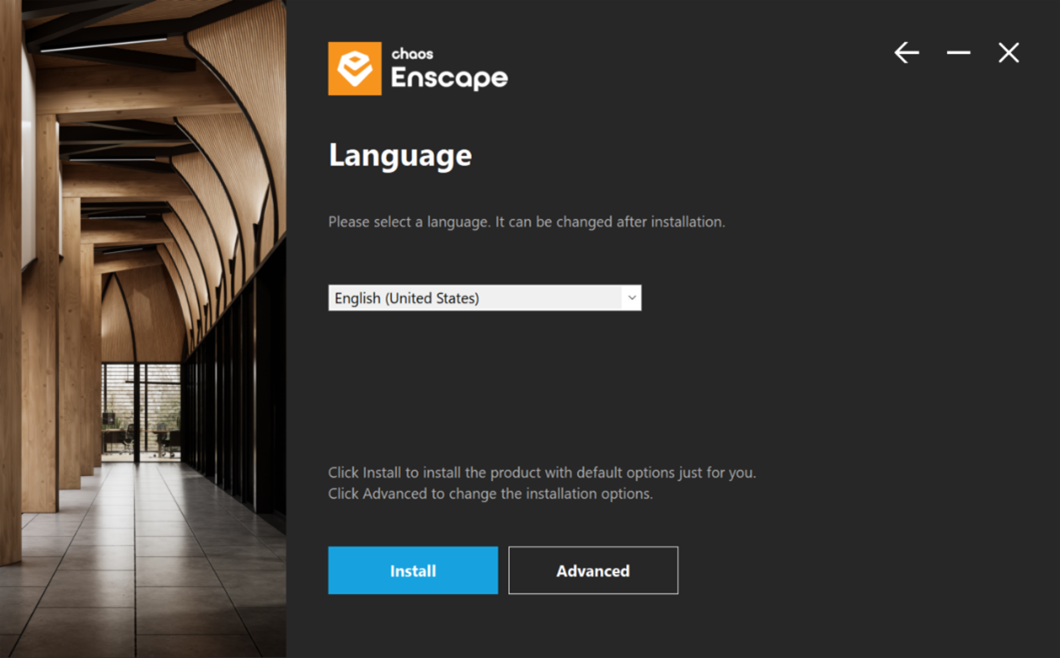
Select your preferred language and click Install. Language settings can be changed after installation under General Settings > Preferences
Once the language has been selected and you click Install, the installer will proceed to install Enscape and all its sub-features for the currently logged in user in the default location: C:\Program Files\Enscape
If you have a previously installed version, Enscape will automatically uninstall the old version first:


The next screen is for Essential Software Packages. If you’re missing software that Enscape requires to function correctly, you will see it listed here with a link to find the installer files. It is advised that you install any missing requirements listed on this screen, as Enscape will not function correctly otherwise.

After installing the requirements and clicking Next, Enscape is finally ready!
Now you should be able to open your CAD software and Enscape should appear as a top-level menu option, or as a Toolbar. If you cannot see Enscape in your CAD, then you may need to enable it in the CAD’s workspace.
Advanced installation becomes available after accepting the license agreement and selecting the language. This option is only available for a fresh installation of Enscape, so if you’d like to access these options again, you will need to uninstall Enscape first.
When clicking Advanced, you have the option to install just for you, the currently logged in user, in a per-user folder, or for all users of this machine.
Install just for you (single-user)
If you choose the Install just for you option, that currently logged in username will be placed between the brackets in the installer window to confirm which user folder Enscape will be installed to.
Additional options for custom installation, including whether to install CAD plugins, are now available for selection.

When done, click on the Install button which will allow the installation to proceed.
Once installation is complete, you will see the installation confirmation screen.
Install for all users
By choosing the option to install for all users of this machine, you will gain an extra option to change the installation location. To change the destination folder, click the three dots on the right side of the path and navigate to where you’d like to install Enscape. Once the destination is set, click Next and pick the CAD plugins you’d like to install.

Once installation is complete, you will see the installation confirmation screen.

Batch User Account Creation
If you have a list of emails in e.g. Excel and would like to add them as new users in Enscape, follow these simple steps:
- Organize emails in a spreadsheet
- Replace “.com” with “.com,” (notice the comma after the .com)
- Select all emails and Copy them to the clipboard
- Paste all emails into the Enscape portal (The format is also displayed in the input field)
Once filled in, just click Invite and the respective users will be added to your list of users.

Once the user has been invited, they will receive an email containing a link to allow them to set a password. Once that has been done the user will appear in the list of users under the User Management page, where the administrator can assign access to a specific Enscape License Key. Each user is listed under their associated email, along with the number of licenses allocated to that user, as well as the current status of the user.
Users can be deleted altogether via the trash can icon and licenses revoked via the checkbox next to each subscription number. Deleting a user is a command for the server to notify the user via an initial email warning that the account will be deleted in 14 days. If the user doesn’t cancel the deletion in the following 14 days, they will receive an email informing them their account has now been deleted. Users holding a fixed-seat license will be required to manually remove the license key from their machine.

User management section
Once the user is added to the list and a license is assigned, they can then log in to their account via the Enscape Account ![]() window -> Account (Sign in) button.
window -> Account (Sign in) button.
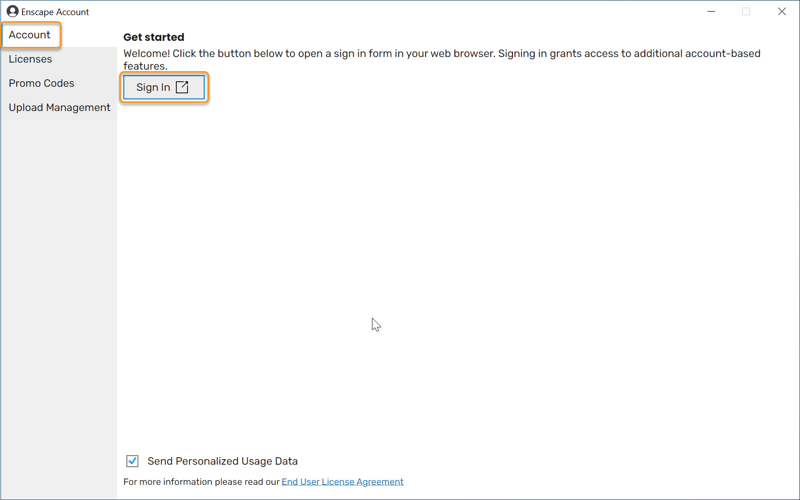

Once you click sign in, you will be directed to the sign in page on your web browser. Here you can fill in your login credentials and click Sign in.
After successfully signing in, you will be able to see your account details in the Enscape Account ![]() window -> Account.
window -> Account.

Renewing Your License
Auto-renewal will be turned off 30 days before your expiration date. If you would like to make any changes to your renewal, they must be made before the last day of your renewal expiration date.
Please contact us to discuss and make any changes to your renewal.
Enscape YouTube Channel
Access hundreds of videos on a variety of Enscape topics.
View Video LibraryATG + Chaos Partnership
Discover more about ATG's partnership with Chaos Group and how we can help.
View PartnershipVisualization Solutions
Get Enscape training or deploy our team to help visualize your designs.
Explore Solutions
